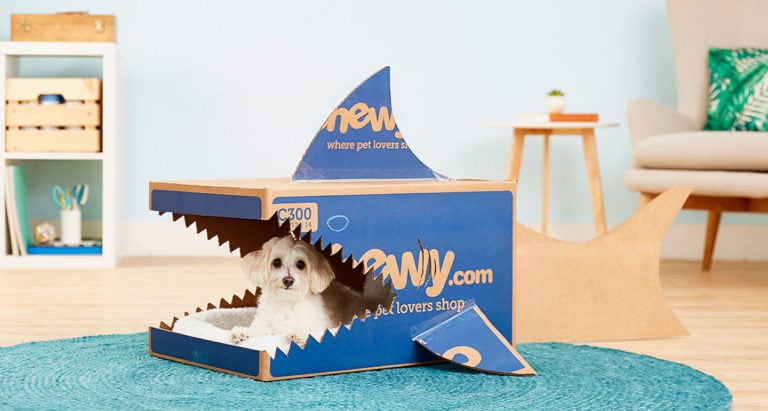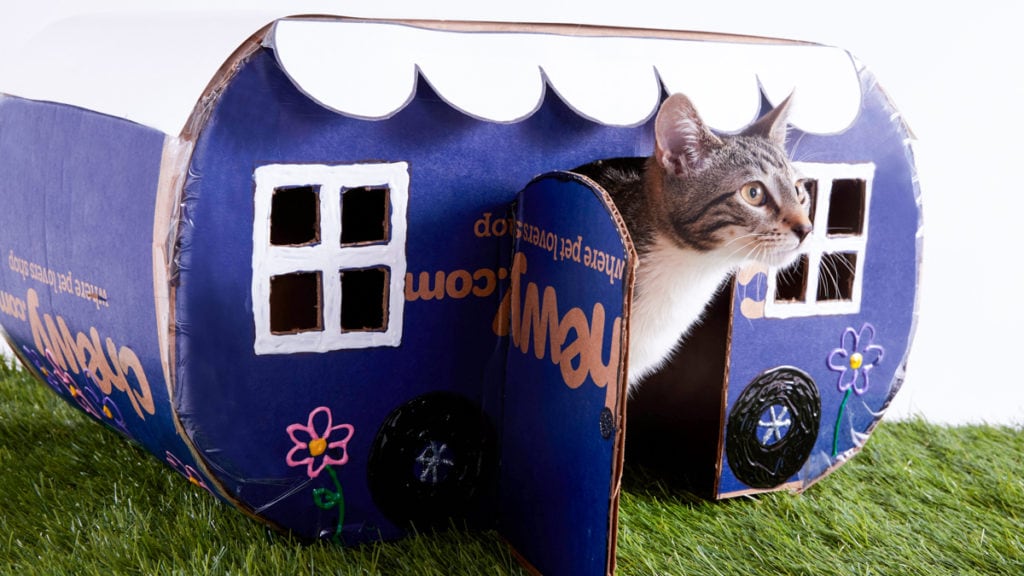
Challenge Level 4: Vintage Camper
What’s cuter than a miniature RV? Well, nothing. Which is why we’re going to help you make one out of a Chewy box. Don’t worry, we’ll be here every step of the way.

Materials: Medium or large Chewy box that your pet can fit inside, marker, ruler, box cutter or scissors, drinking glass, duct tape, clear packing tape, craft paint or poster board
Step 1: With the box right side up, cut off the top flaps and the short inner flaps on the bottom. Turn the Chewy box upside down. Reinforce the seam with clear tape.
Step 2: On one of the longer sides of the box, measure halfway down from the top right corner and make a mark. Then measure 4 inches in from that same top corner toward the center and make another mark, and repeat for the left side. Take your marker and connect the marks with a line that has a slight curve.
Step 3: Repeat for the bottom corners.

Step 4: Repeat Steps 2 and 3 for the opposite side, and cut the four corners off. The two longer sides of the box should only be attached at the top.

Step 5: On the shorter ends, curve the top parts down until they touch the floor. Make creases to make them easier to bend, and then tape them into place (use duct tape for the inside and clear tape on the outside).
Step 6: On one of the longer sides, draw a door with a slightly rounded top. The top of the door should start about 3 inches down from the top edge of the box, and the door should be centered. Cut the top and one side of the door, leaving the other side attached so it can open.

Step 7: Draw a window on the both sides of the door and cut out the panes. The tops of the windows should be aligned with the top of the door.
Step 8: Use the bottom of a glass to trace a wheel under each window that touches the bottom edge of the box.
Step 9: Take a longer flap (or poster board) and use the glass to draw a repeating scalloped pattern along the long side. Cut along the lines so you have one scalloped edge for an awning. Cut it lengthwise so that it’s 2.5 inches wide.
Step 10: Use clear packing tape to attach the awning you just made to the top edge of the box.
Step 11: Time to decorate! Use craft paint to paint the awning, door, wheel or sides of the camper however you want.

Give your pet the grand tour of his new vintage camper, which is perfect for leisurely indoor glamping at Camp Chewy. Put a pet bed or crate mat inside for a finishing touch.
Once you’ve unloaded all your Chewy pet supplies, a Chewy box can become so much more—from a DIY cat house or DIY dog house to stylish dog and cat furniture. And you deserve a pat on the back for trying your hand at these Chewy box challenges. Don’t forget to show off your final products for bragging rights!
Can’t get enough of our Chewy box crafts? Try making some fun kid—and adult—games or see how you can get organized with our Chewy box life hacks.

Nikki Naser, BeChewy Senior Editor
Instead of owning 30 cats, Nikki has an impressive collection of 30 cat-themed T-shirts, and just 4 pets—a ginger-haired senior cat, a senior Maine Coon, a middle-aged Choodle, and a young kitty who showed up one day on the back steps. A former Orlando resident, Nikki worked on several tourism publications before moving to South Beach. When she’s not stopping to take pics of community cats to post on Instagram, Nikki spends her time with the office pets at Chewy, writing for their BeChewy blog.
Share: